Puntingform.com.au has data on all tracks and rail positions that shows the position in running of winners over a long sample size. Data can be analysed by strike rate and return on investment (ROI). For more, CLICK HERE.
Unlike a tennis court or soccer pitch, which are identical no matter where you play, every racetrack has its own quirks. And for punters, that’s where the edge lies – in knowing your tracks.
Across Australia, most tracks behave with a fair degree of consistency. I’ll use my backyard of Victoria as an example, but the same principles apply nationwide.
Tighter-turning tracks with short home straights such as The Valley, Murtoa and Warracknabeal generally favour horses on speed and close to the rail. Tatura and Stony Creek fall into the same category.
Image: Murtoa, which is continually turning and has a short home straight
By contrast, spacious circuits like Flemington and Pakenham, with their long, forgiving straights, give backmarkers more opportunity to build momentum and finish over the top.
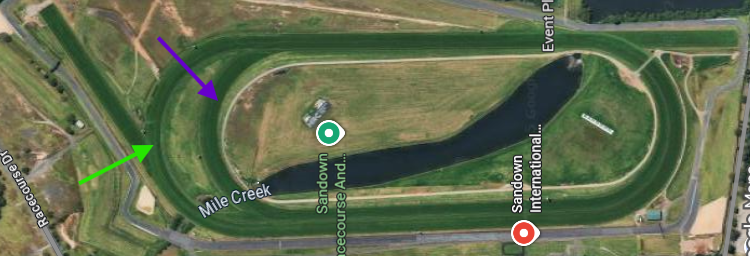
Sandown is a unique case with two quite distinct layouts. The inner Lakeside circuit is tighter with a shorter straight, and typically suits leaders. The outer Hillside track has a generous 470 metre run home and tends to play fairer, often giving swoopers their chance.
Image: Sandown. The purple arrow is the Lakeside track, Green the Hillside track. The chute top left is the 1000m start (more below).
Statistically, it’s still easier to win races from the first four in running than anywhere else, which makes sense given early speed is such an important ingredient in ability.
Of course, these are general patterns. There will always be exceptions depending on factors like rail position, weather, wind and track condition.
Some tracks also have physical quirks worth noting. Kilmore has a downhill run around the home bend that many horses struggle to handle. If you find one that has performed well there before, you can bet with more confidence.
Mornington has an uphill rise in the home straight, and horses trained locally tend to have a natural advantage. Proven form at the track should always be respected.
Rail position can also give strong clues as to how a track will play. Despite being great layouts, Bendigo and Geelong with the rail true often favour on-speed runners, while both tend to race better when the rail is out slightly. Cranbourne is similar, with +3 metres often proving the fairest position.
It’s worth familiarising yourself with where the start points are on each track. A quick online search will show you a track map with the various starting points.
The longer the run to the first turn, the less impact the barrier draw has. When the start is closer to a bend, there’s a scramble for position early and wide barriers can be costly.
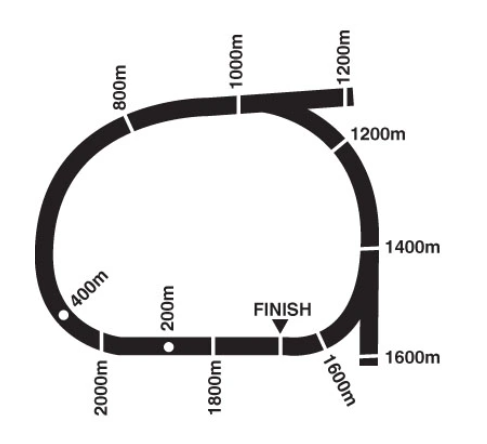
Many tracks also feature sprint chutes. The 1000 metre chute at Sandown, for instance, starts from the top of the straight with only a gentle bend, meaning barriers matter little. Caulfield, Bendigo, Sale and Seymour, amongst many other tracks, have sprint starts that give runners a long run before the turn, so covering a bit of ground there isn’t as big a disadvantage as in multi-turn races.
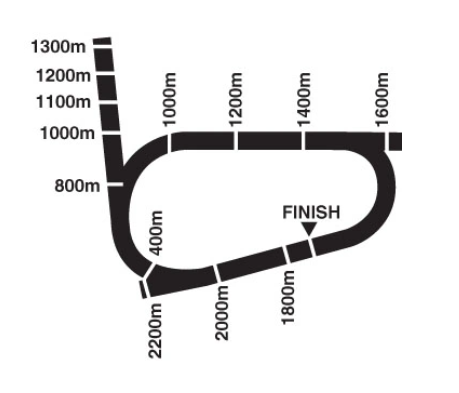
Image: Seymour, note the chute top left that has several sprint starts, all with a decent run into one bend.
Understanding the start points also helps you assess how wind might affect a race. The longer the field runs into a headwind, the tougher it is for leaders and those racing without cover.
These are general rules, not absolutes. But if you understand how each track behaves and how layout, rail position and conditions interact, you’re already ahead of most punters.
View this post on Instagram